Technical Onboarding Process for Service Provider
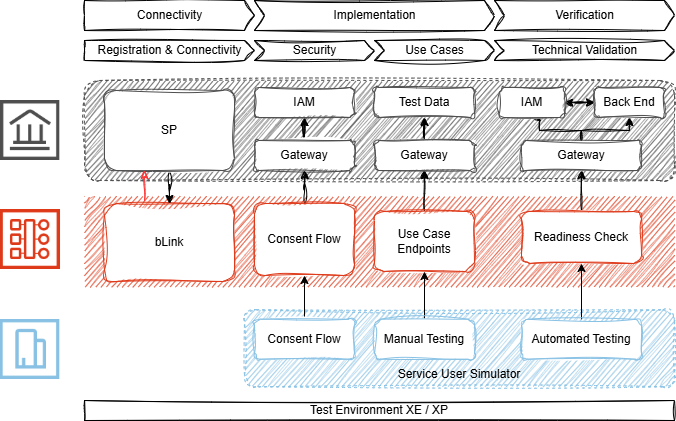
The onboarding procedure for a Service Provider (SP) is performed in three different phases: connectivity, implementation, and verification. The figure below despicts an overview of these phases and the following sections explain the relevant details.
Connectivity
In the first phase of testing, the SP focuses on the registration as participant on bLink and establishing the connection to the testing environment.
To register for the test environment, the SP provides the following documentation via the bLink Support Portal:
- Completed "Connectivity Template Service Provider"
- Full chain client certificate for the connection SP → SIX to request the bLink Directory. The TLS Certificates requirements are documented in Security - TLS Certificates.
- Connectivity information and full chain server certificate for the connection SIX ↔ SP
Further information can be found in the Connectivity and Registration.
Once the SP is configured, the following code snippet can be used to test connectivity to bLink. Besides testing the connectivity, the SP will retrieve a list of all registered clients on bLink to get an impression of the functionality of the bLink Directory.
curl -v \
  --cert <your-cert>.pem \
  --key <your-key>.pem \
  -H "X-Correlation-ID: <correlation-id>" \
  'https://api-qa.np.six-group.com/api/bankingservices/xe/b-link-consent-2/platform/v3/directory/clients'
Note: This code example is specific for Internet connection. The host name may differ depending on the network type used.
The connection SIX ↔ SP will be tested in close collaboration between the bLink Support team and technical contacts of the Service Provider.
Implementation
The implementation phase focuses on implementing and testing the consent flow and designated API modules. To simplify the implementation process, the bLink Service User Simulator can be used, which acts as the counter-parting Service User.
Requirements
In order to start the implementation phase, the following requirements have to be fulfilled:
- Connectivity is established on both sides
- Accounts for the test users are created via the bLink Support Portal
Procedure
The Service User Simulator supports the functionalities to perform the "Consent Flow" with a specific provider to retrieve the authorization credential, which is needed to manually test the API endpoints.
Security
The consent flow is used to ensure security. It is used for granting consent to a Service User to access specific resources of a Service Provider according to the Consent Management specifications.
By accessing the simulator GUI, the test user is able to select the respective Service Provider and desired scopes. The user will then be redirected to the configured e-banking landing page. After successfully logging in, the user will be guided through the consent page of the provider in order to grant consent to the resources and receive the required access tokens to exchange data via bLink. Once the consent is successfully established, the user is redirected to the simulator and the retrieved tokens will be displayed. The user can maintain the tokens by enforcing revoke, refresh or activate to inherit the tokens for manual testing.
The following items describe the basic calls that will be performed with the simulator for the Consent Flow (the numbers each correspond to a specific step in Consent Management 2.0).
- (4) Get list of active Providers: This request retrieves a list of all active Service Providers from bLink directory and selects bLink Simulator 2 or respective SP.
- (7) Initiate OAuth 2.0 authorization code grant flow: The "Action" button simulates the redirect to the e-banking landing page. All selected scopes will be requested.
- (18) Verify
redirect_uriand state from step (7), request tokens, and submit username for validation. - (31) Display consent states and tokens.
Tokens issued by the bLink simulator are not persisted and will be lost when the simulator is restarted.
Use Cases
The manual testing aims to test and validate the correct implementation of the use cases on bLink and all its endpoints.
This section completely simulates the procedure from start to end involving all parties: SU, bLink, and SP. The SU is represented by a request template with a User Interface to set up the calls to the specific endpoints. The simulator is self-contained and must be adjusted with the parameters that the simulator will use to call the SP endpoints. The simulator can be used to validate if the correct/expected response code is delivered and if the responses comply with the required format.
The following items describe the basic calls that can be performed with the simulator:
- Service Provider selection: The simulator performs a directory call to display the registered providers the user can use, with the supported use cases.
- Use Case and URL: All use cases supported by the SP and respective endpoints will be listed. Select the specific use case and endpoint that should be requested.
- Configurations: The required headers will be prefilled, but can be adjusted manually. Specific requests allow individual adjustments of parameters according to the preferences of the test user (format must comply with the standards).
If the user performs the request successfully, the following information will be returned from the API:
- Indication of successful execution.
- Response body to validate the result.
- Headers of the response.
On the other hand, in the event of a failed request, the API will return the following information:
- Indication of unsuccessful execution.
- Error response with corresponding error code.
- Additional details according to the common error response.
Verification
The simulator offers an "Automated Testing" feature to verify the Service Providers implementation. This feature verifies whether consent flow and applied use cases are correctly implemented and meet the requirements and specifications. The procedure consists of a set of predefined positive and negative test-cases to verify the various aspects of connectivity, token management and processing API calls.
The result of all executed tests are bundled in a report which can be downloaded and extracted to investigate the results.
Once all tests have been successfully performed, the report must be submitted via bLink Support Portal - Technical Validation. The successful verification is the final step in the technical onboarding and part of the admission process to activate new Service Providers on the bLink Production Environment.
Production Go-Live
Once a Service Provider passes the bLink admission process, the SP must provide a new certificate that complies with the requirements described in TLS Certificates and a Go-Live date will be agreed upon. At the specified date, the Service Provider participant status changes from "ONBOARDING_DEVELOPMENT" to "ACTIVE" and all admitted use cases from "ONBOARDING_CERTIFICATION" to "CERTIFIED".