Client Certificates Issued by SIX
SIX issues client authentication certificates for bLink on request, for the test environments as well as for production. This page describes how to request, obtain and deploy such a certificate. The general certificate conditions are described in TLS Certificates.
Certificates issued by SIX are whitelisted as part of the issuing process. You do not have to submit the full chain certificate separately.
Certificates issued by SIX are exclusively intended for authentication against SIX services. The certificates and the associated private keys must not be reused for other purposes, services, environments or third party systems. This ensures clear trust boundaries, reduces security risks and supports reliable certificate lifecycle management.
Process Overview
| Step | Who | What |
|---|---|---|
| 1 | Participant | Prepares a Certificate Signing Request (CSR) according to the SIX requirements |
| 2 | Participant | Submits the CSR through the bLink Support Portal |
| 3 | SIX | Validates the request and issues the certificate. A non-compliant CSR may require a new submission |
| 4 | SIX | Delivers the certificate together with the certificate chain |
| 5 | Participant | Deploys the certificate and uses it immediately |
Step 1: Prepare the Certificate Signing Request
A Certificate Signing Request (CSR) is a text file that contains your public key and the details of your company. You generate it together with a private key. You send only the CSR to SIX, never the private key.
You generate the CSR locally and retain full control over the private key. The private key must remain adequately protected with you at all times. The CSR must not contain any confidential or secret data.
The CSR should be created on, or for, the system that will later use the certificate. A separate certificate is required per environment, therefore the target environment must be part of the Organisational Unit (OU) as described below.
CSR Requirements
| Attribute | Requirement |
|---|---|
| Format | PKCS#10, PEM encoded (Base64) |
| Key type | RSA |
| Key length | 3072 or 4096 bits |
| Hash algorithm | sha256 |
| Key Usage | Digital Signature |
| Extended Key Usage | Client Authentication |
| Common Name (CN) | <appType>-<instituteIdentifier>[-<instanceId>], see below |
| Organisation (O) | Registered legal name of your company, mandatory |
| Organisational Unit (OU) | bLink - Test for the test environments XE and XP, bLink - Production for production |
| Country (C) | ISO 3166 two letter code (alpha-2), for example CH, mandatory |
| Subject Alternative Name (SAN) | email address of shared mailbox for certificate lifecycle notifications, mandatory |
| Subject Alternative Name (SAN) | DNS of the system that will use the certificate, recommended |
Common Name (CN)
The Common Name identifies the application the certificate is issued for. It is composed as follows:
<appType>-<instituteIdentifier>[-<instanceId>]
appType, only one type per certificate is allowed:
| Value | Use for |
|---|---|
sp | Your Service Provider application |
su | Your Service User application |
onprem | An instance of your on-prem Service User application |
selfservice | Your instance administration service application |
Institute identifier: your IID or CID, for example IIDP01234 or CIDP0123456789.
Instance ID: only for the appType onprem. For a new instance you can choose the value yourself, subject to the following rules:
- It must uniquely identify the instance and cannot be changed later
- Maximum length is 36 characters
- Allowed characters are uppercase letters
A-Z, lowercase lettersa-z, digits0-9, period.and hyphen-
Examples: sp-IIDP01234, su-CIDX0123456789, onprem-CIDP0123456789-zurich.node01
If you are unsure which values apply to you, contact bLink support before creating the CSR.
All subject attributes must use ASCII characters only. Do not use umlauts or other special characters, in particular in the Organisation (O). Use ae instead of ä, oe instead of ö, ue instead of ü and ss instead of ß.
Choose Your Method
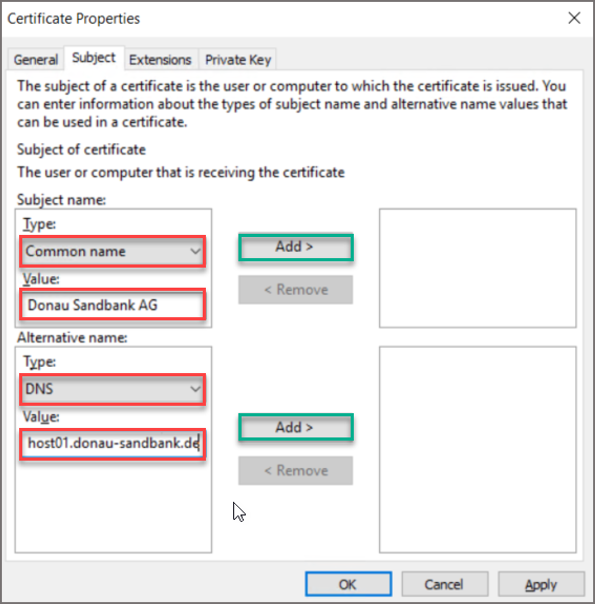
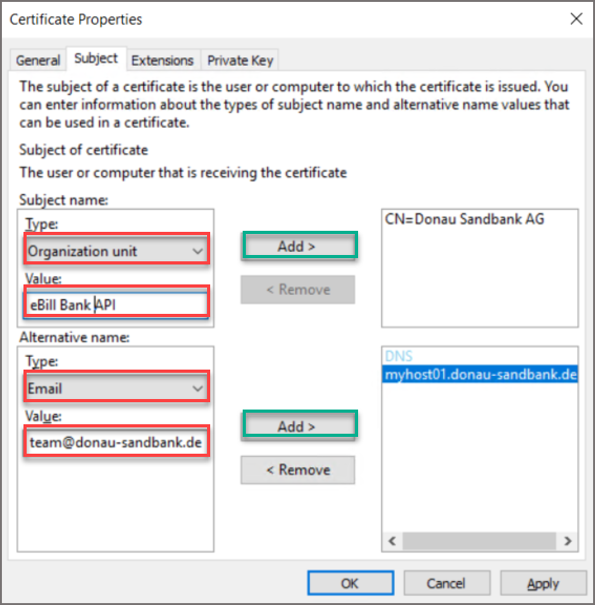
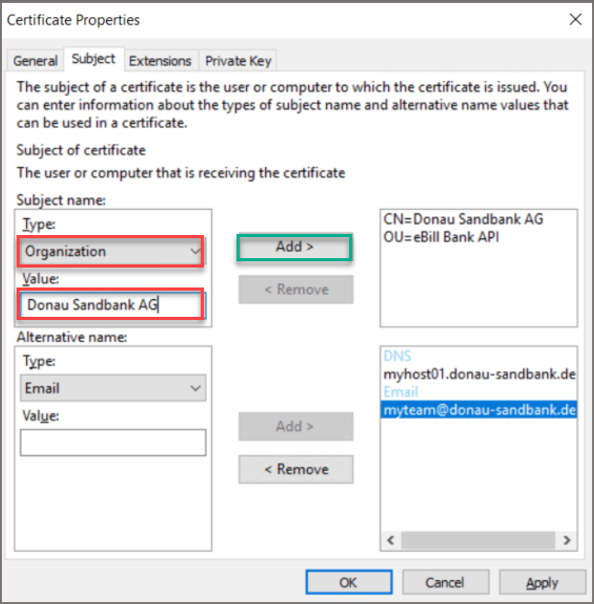
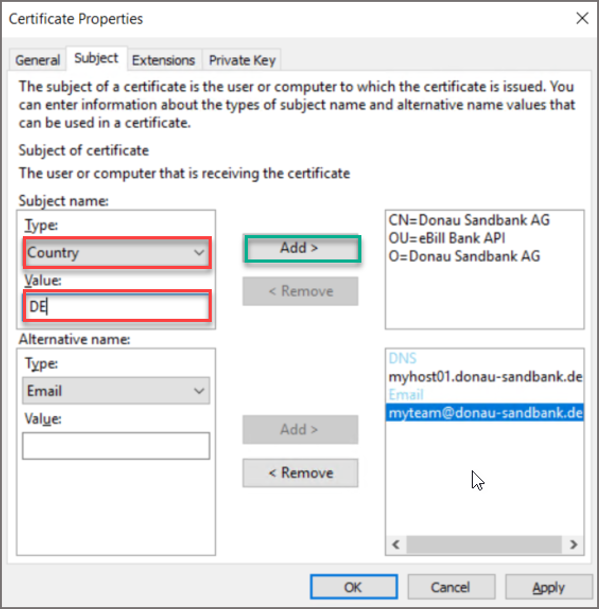
The following guides describe how to create a Certificate Signing Request for the SIX BBS Public Key Infrastructure in general. The screenshots of the Windows dialogs in Method 3 show example values of other SIX services, such as eBill, and therefore differ from the bLink requirements. Always apply the bLink CSR requirements listed above, in particular for the Common Name (CN) and the Organisational Unit (OU).
The following three methods all produce the same result, a PKCS#10 CSR in Base64 format. Choose the one that fits your environment.
- Method 1, OpenSSL: for Linux distributions and Microsoft Windows with OpenSSL installed
- Method 2, certreq.exe with a configuration file: for Microsoft Windows, repeatable and easy to document
- Method 3, Certificate Enrollment wizard: for Microsoft Windows, if you prefer a graphical interface
Method 1: OpenSSL Using bash on Linux Distributions and Microsoft Windows
The commands below use bash syntax. On Microsoft Windows, run them in a bash environment such as Git Bash or the Windows Subsystem for Linux (WSL). If you prefer cmd.exe or PowerShell, replace the variables in the commands with the actual values, and adjust the paths accordingly. Windows users can also omit -rand /dev/random, since OpenSSL uses the Windows random number generator.
1. Declare the variables
Values that contain spaces, such as the Organisational Unit, must be enclosed in quotation marks, otherwise only the first word is used.
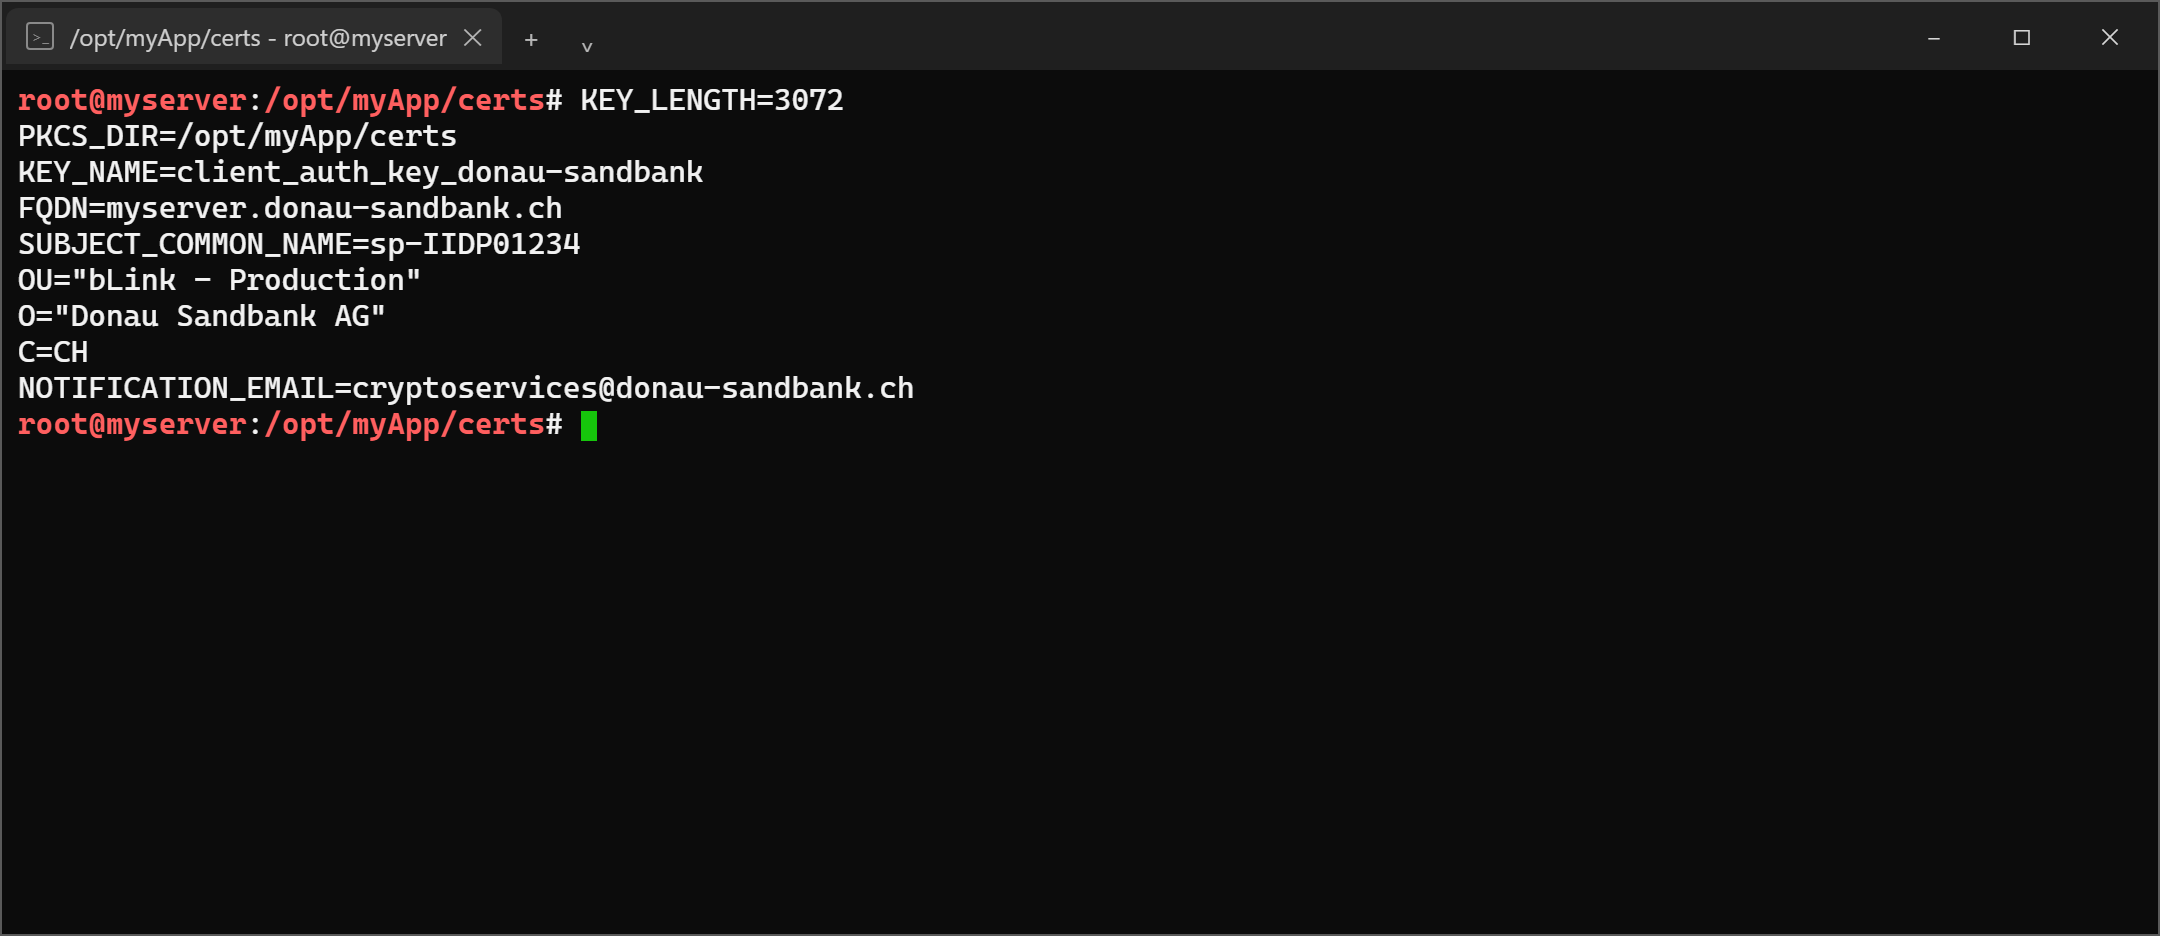
KEY_LENGTH=3072
PKCS_DIR=/opt/myApp/certs
KEY_NAME=client_auth_key_donau-sandbank
FQDN=myserver.donau-sandbank.ch
SUBJECT_COMMON_NAME=sp-IIDP01234
OU="bLink - Production"
O="Donau Sandbank AG"
C=CH
NOTIFICATION_EMAIL=cryptoservices@donau-sandbank.ch
| Variable | Meaning |
|---|---|
KEY_LENGTH | Key length in bits, 3072 or 4096 |
PKCS_DIR | Directory in which the private key and the CSR are stored. Create it beforehand |
KEY_NAME | File name of the private key |
FQDN | Hostname of your instance, also used as the file name of the CSR |
SUBJECT_COMMON_NAME | Common Name according to the scheme above, for example sp-IIDP01234 |
OU | bLink - Test or bLink - Production |
O | Registered legal name of your company |
C | Country code according to ISO 3166 alpha-2, for example CH |
NOTIFICATION_EMAIL | Shared mailbox for lifecycle notifications |
2. Generate the private key
Choose one of the two options below.
Option A, no private key protection except file system permissions:
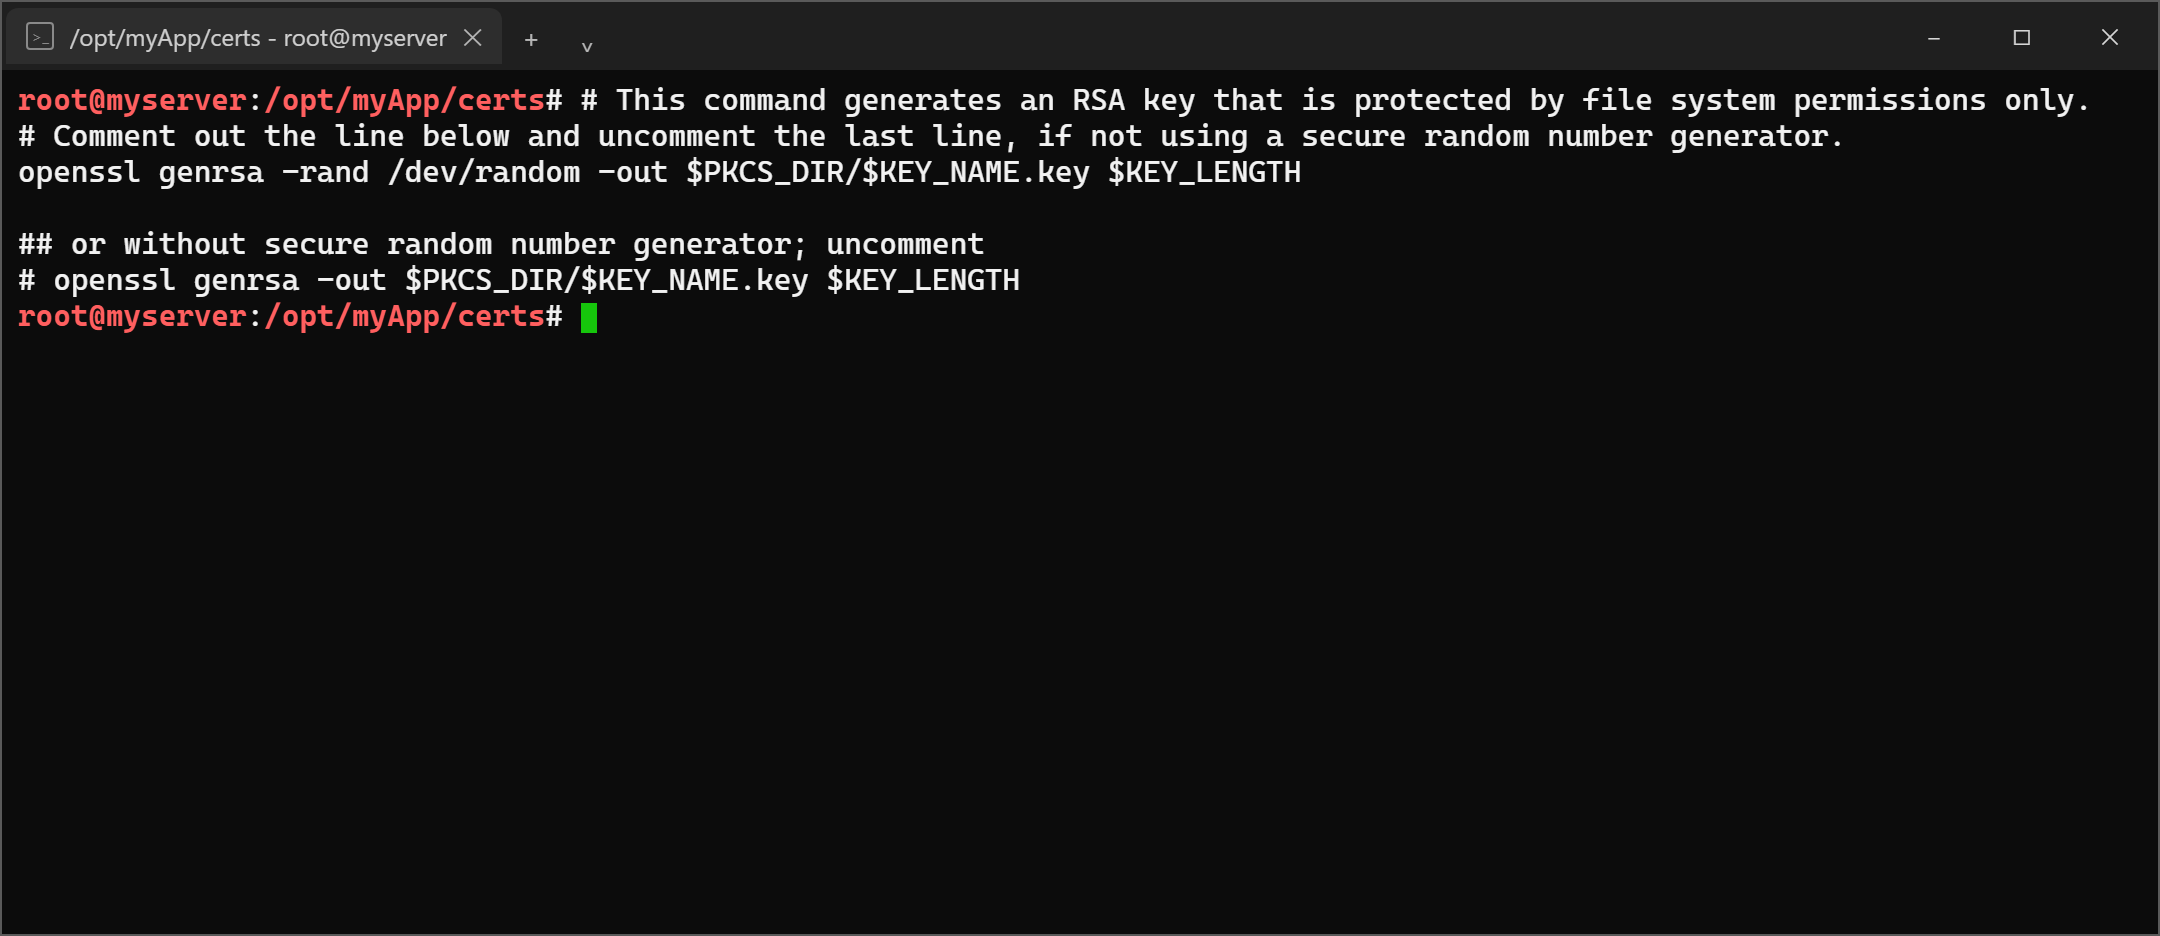
# This command generates an RSA key that is protected by file system permissions only.
# Comment out the line below and uncomment the last line, if not using a secure random number generator.
openssl genrsa -rand /dev/random -out $PKCS_DIR/$KEY_NAME.key $KEY_LENGTH

## or without secure random number generator; uncomment
# openssl genrsa -out $PKCS_DIR/$KEY_NAME.key $KEY_LENGTH
Option B, protected private key. The generated key is encrypted with AES-256 using a key derived from the passphrase you enter, and you have to enter and confirm that passphrase. Store the passphrase safely, it is needed whenever the key is used.
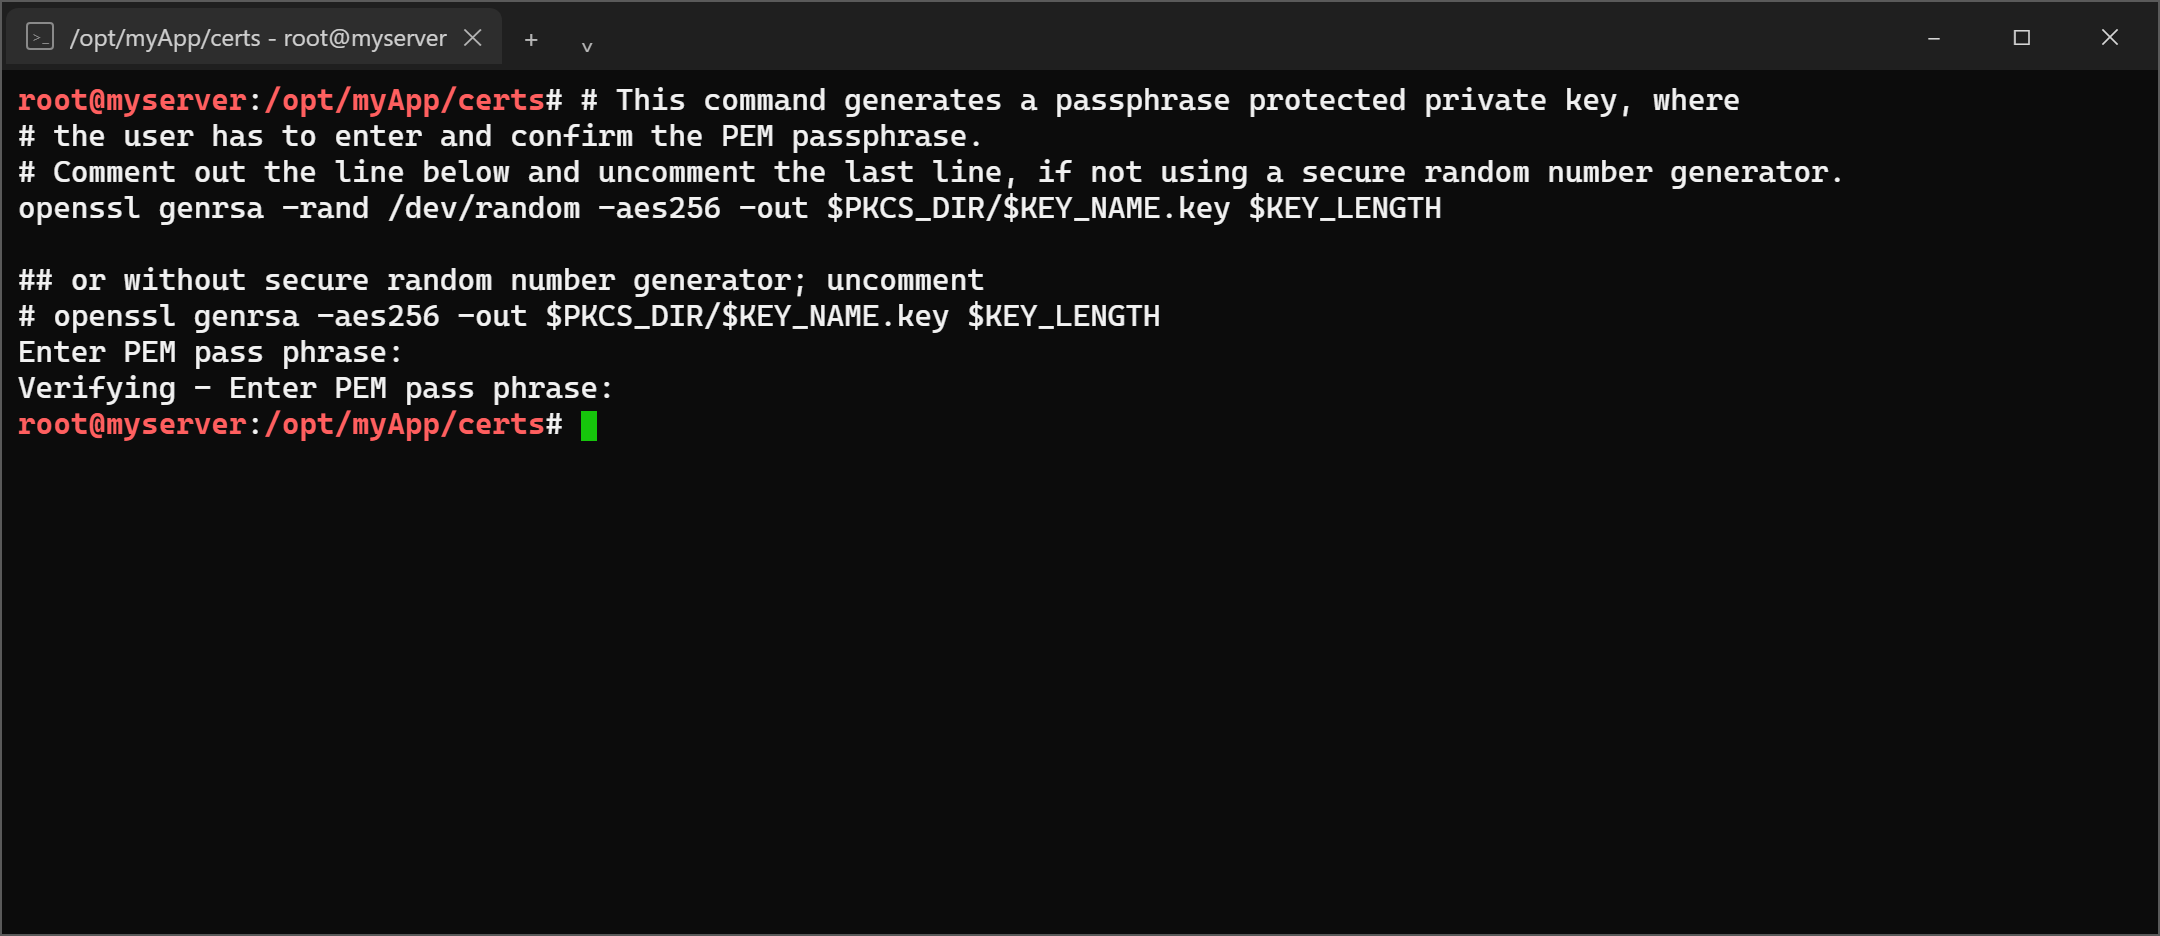
# This command generates a passphrase protected private key, where
# the user has to enter and confirm the PEM passphrase.
# Comment out the line below and uncomment the last line, if not using a secure random number generator.
openssl genrsa -rand /dev/random -aes256 -out $PKCS_DIR/$KEY_NAME.key $KEY_LENGTH

## or without secure random number generator; uncomment
# openssl genrsa -aes256 -out $PKCS_DIR/$KEY_NAME.key $KEY_LENGTH
The file $PKCS_DIR/$KEY_NAME.key is your private key. Keep it on the system, restrict access to it and never send it to SIX or to anyone else.
3. Generate the CSR
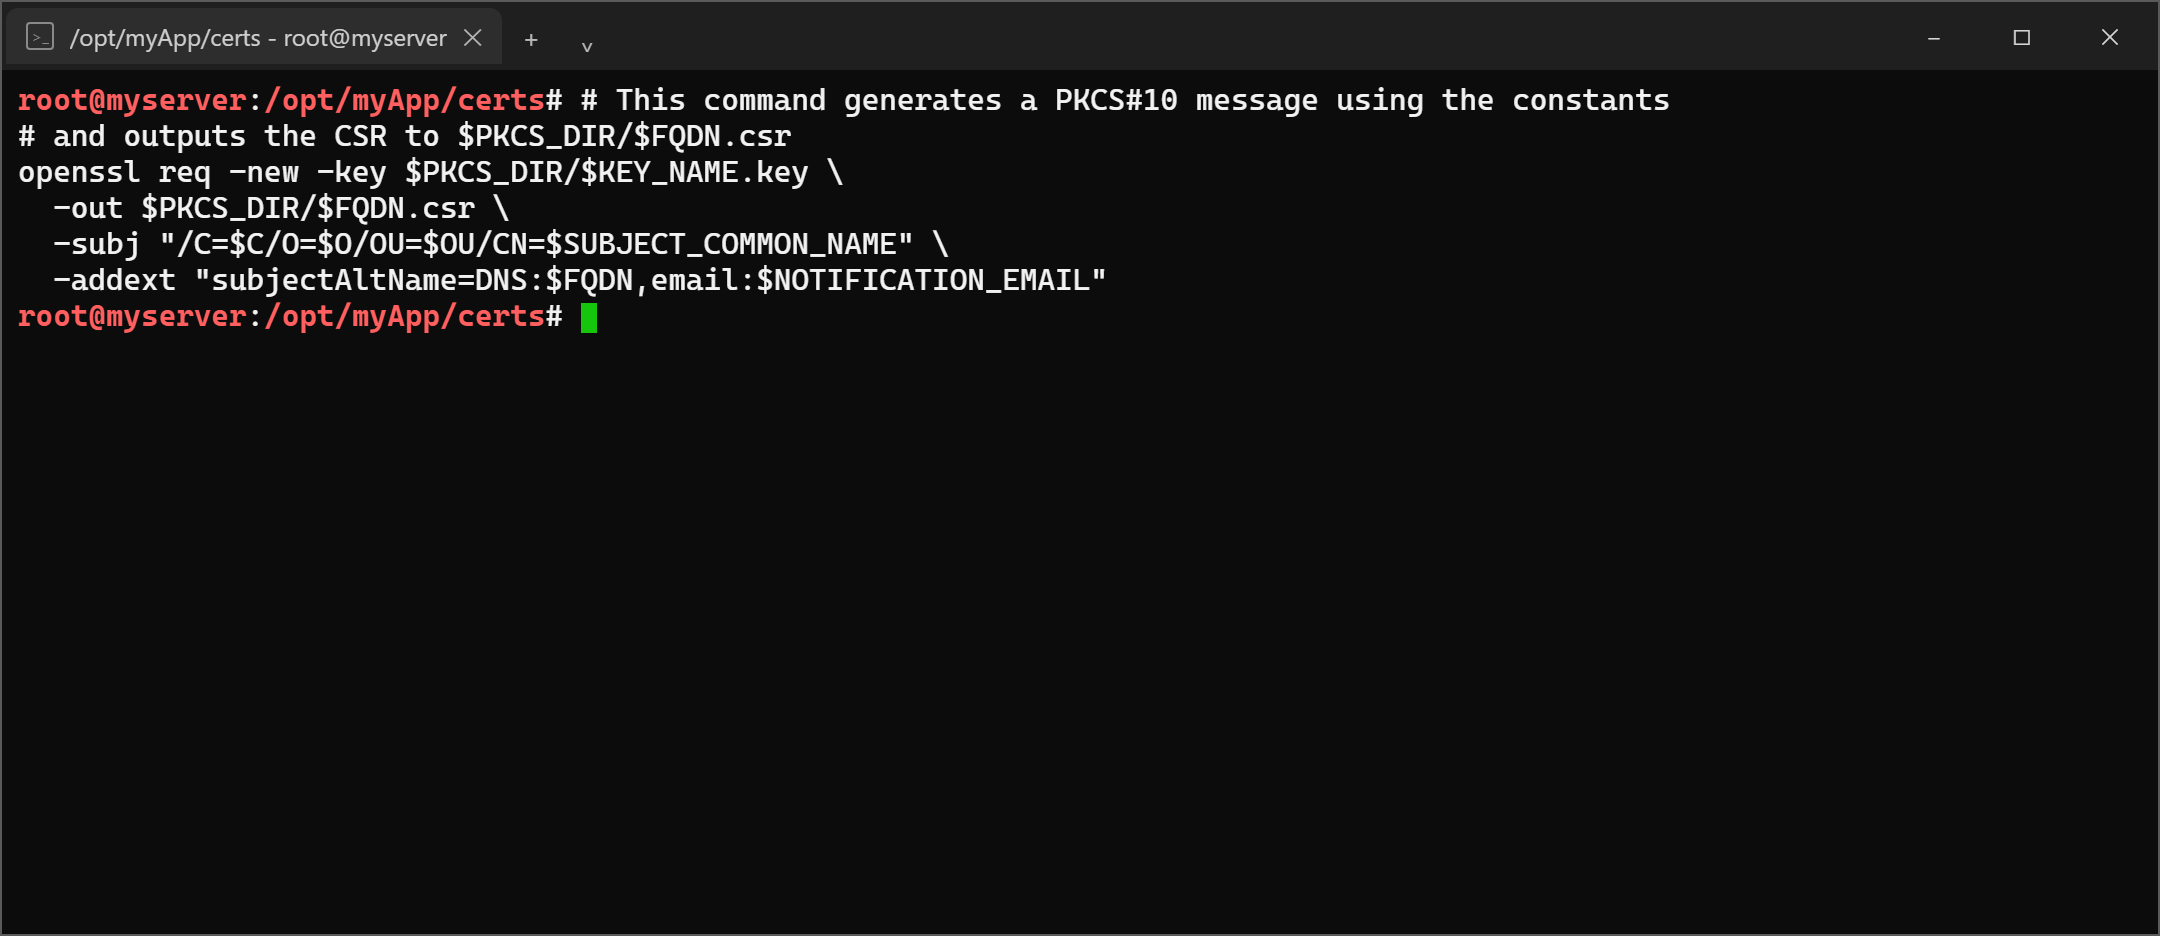
# This command generates a PKCS#10 message using the constants
# and outputs the CSR to $PKCS_DIR/$FQDN.csr
openssl req -new -key $PKCS_DIR/$KEY_NAME.key \
  -out $PKCS_DIR/$FQDN.csr \
  -subj "/C=$C/O=$O/OU=$OU/CN=$SUBJECT_COMMON_NAME" \
  -addext "subjectAltName=DNS:$FQDN,email:$NOTIFICATION_EMAIL"
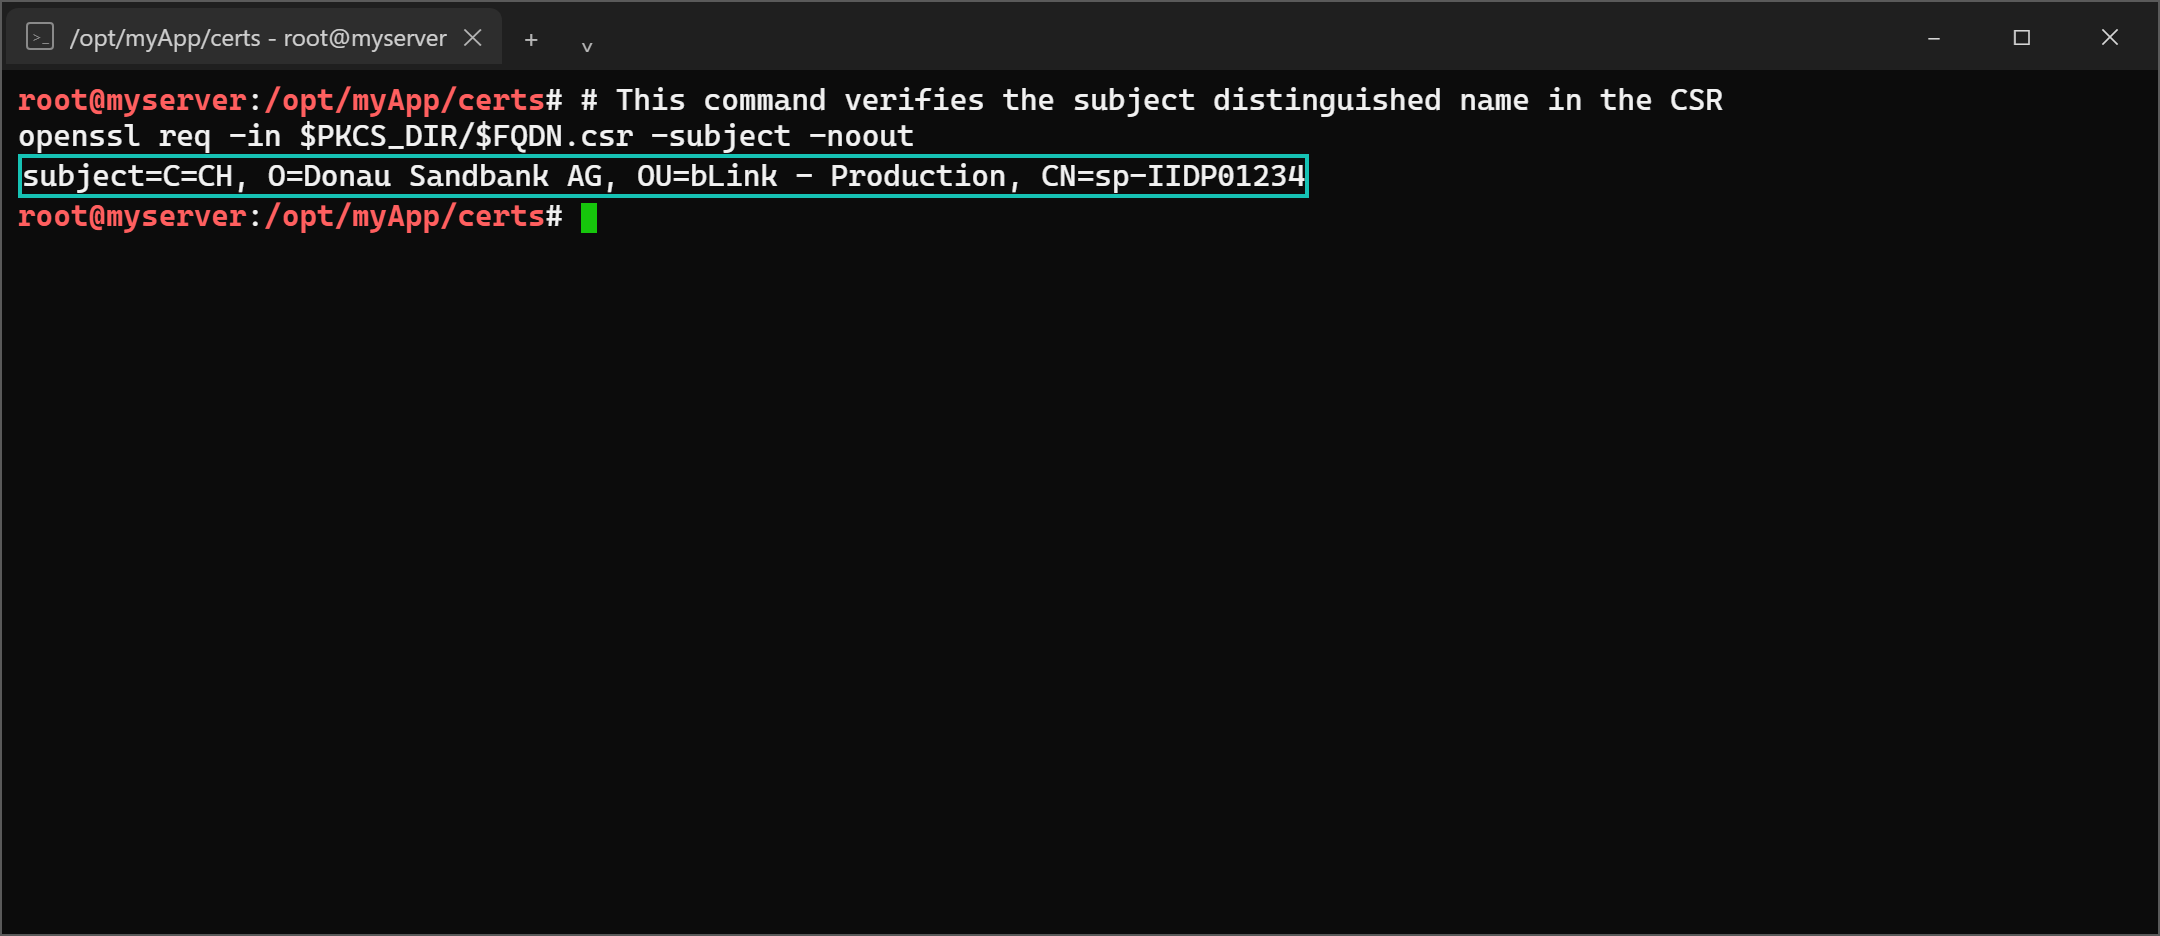
4. Verify the subject distinguished name in the CSR
Compare the output with the CSR requirements above before you submit the request.
# This command verifies the subject distinguished name in the CSR
openssl req -in $PKCS_DIR/$FQDN.csr -subject -noout
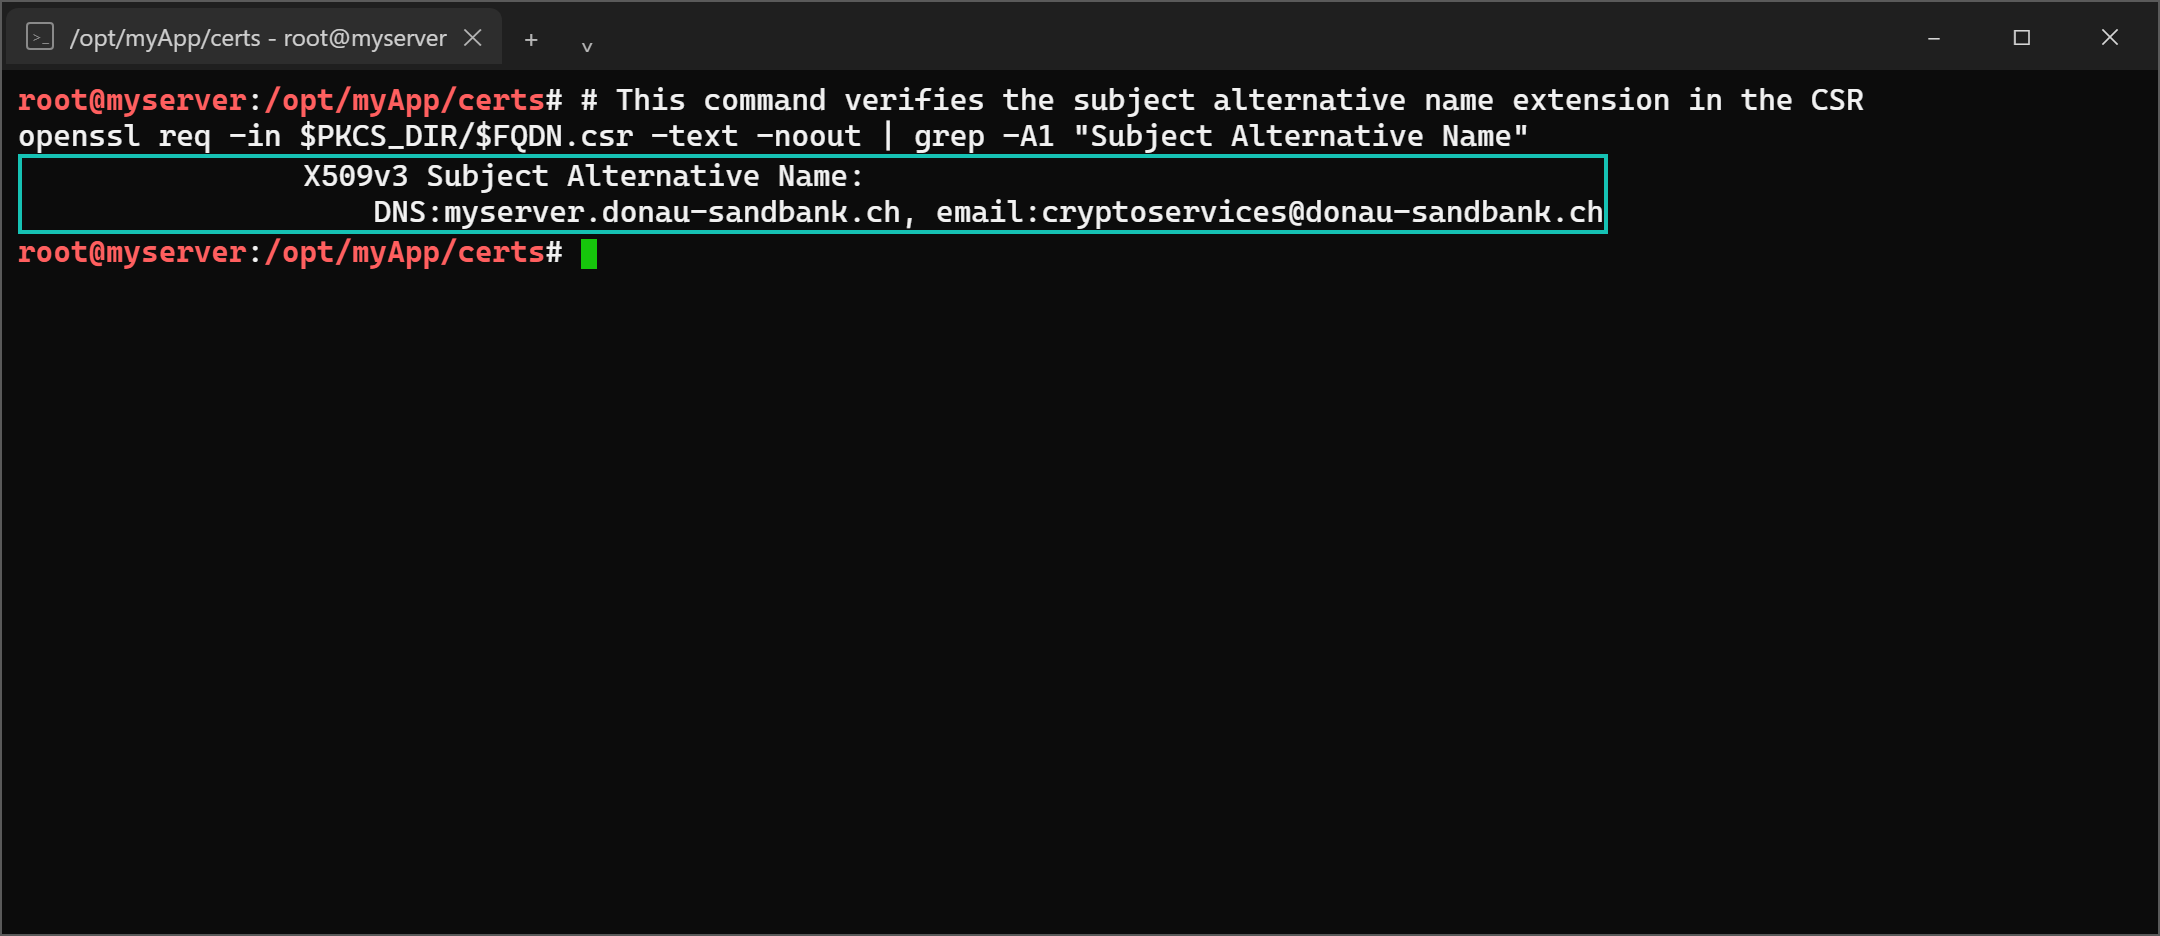
5. Verify the SAN extensions in the CSR
# This command verifies the subject alternative name extension in the CSR
openssl req -in $PKCS_DIR/$FQDN.csr -text -noout | grep -A1 "Subject Alternative Name"
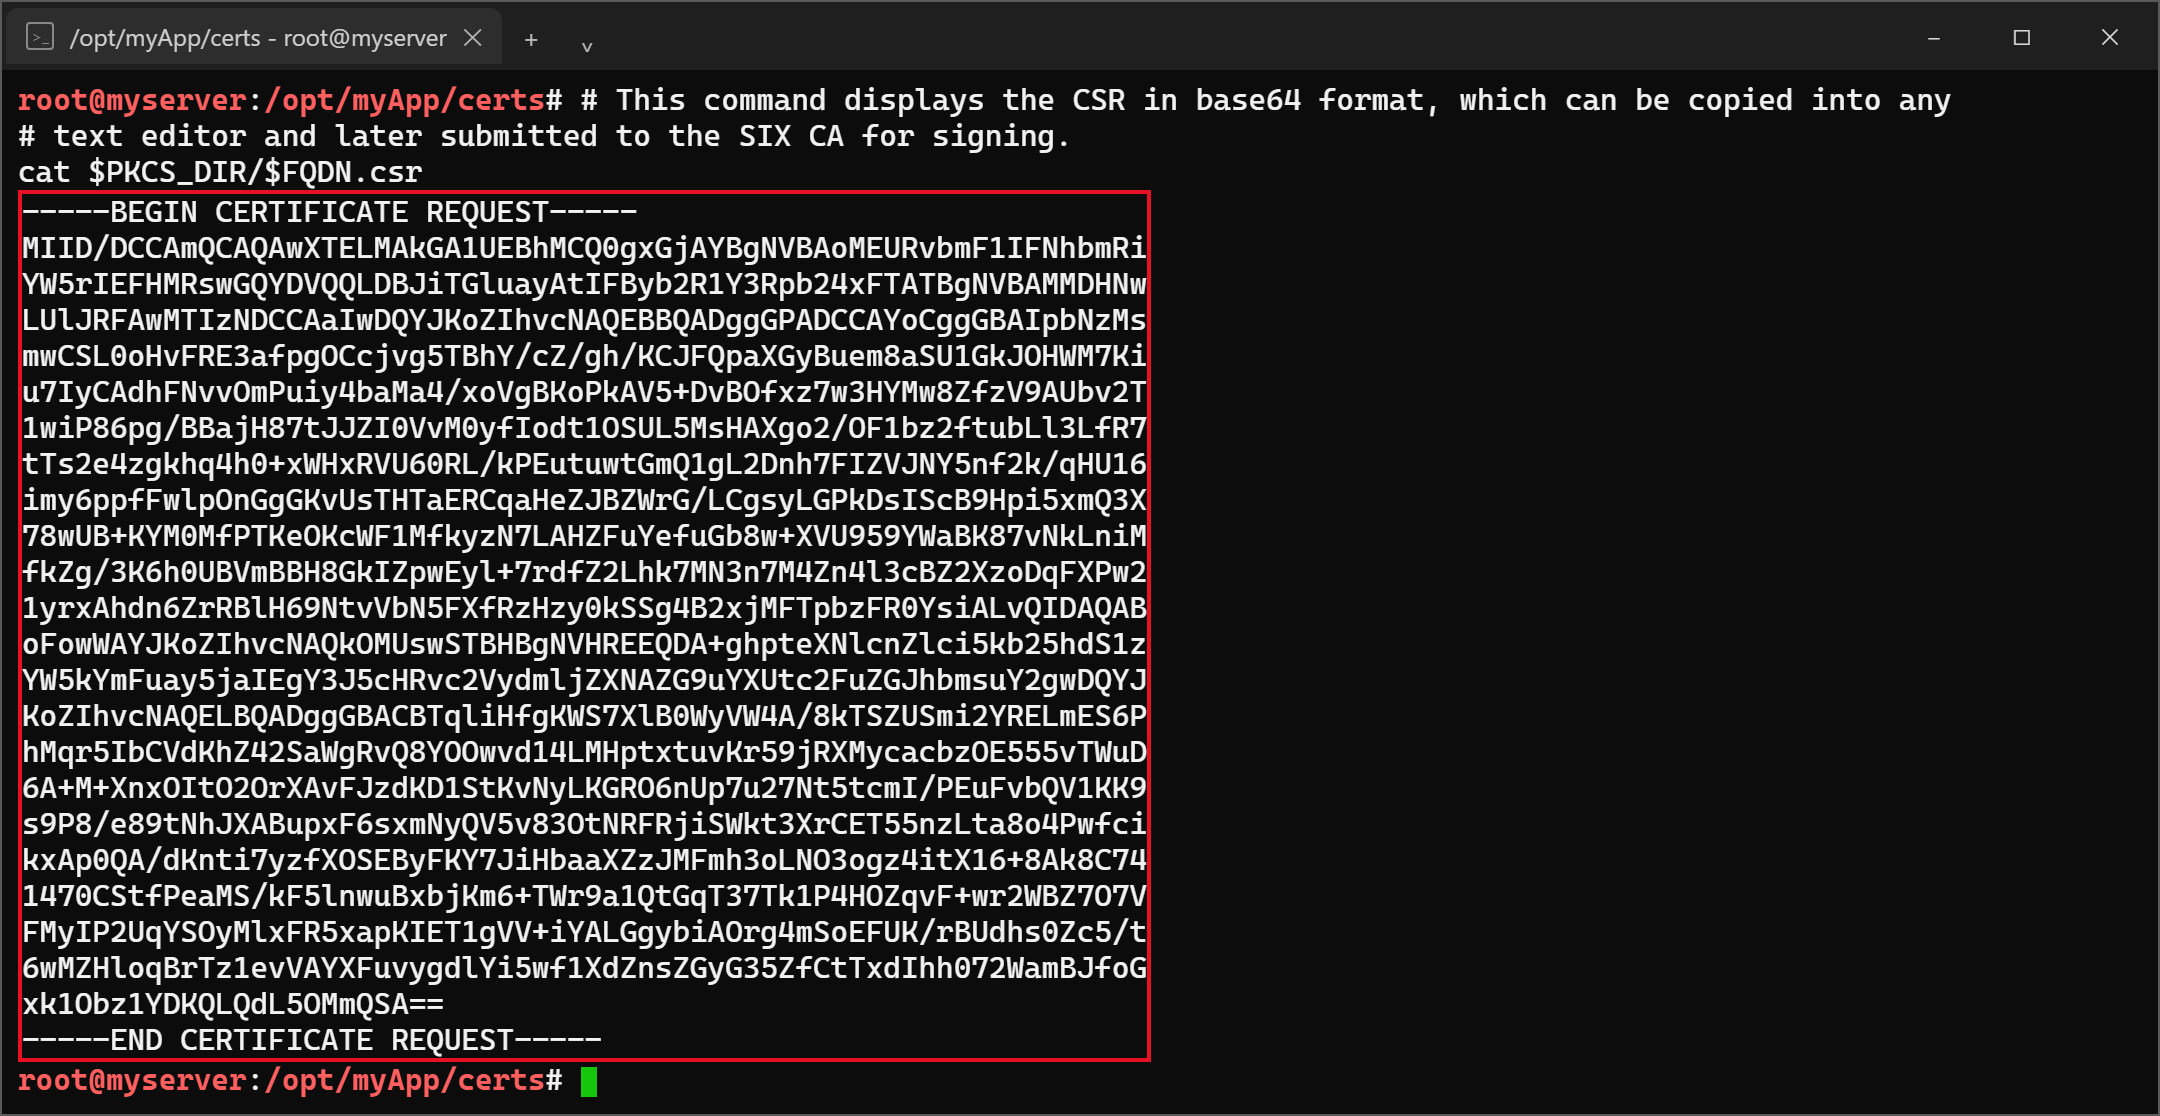
6. Display the CSR for later submission
# This command displays the CSR in base64 format, which can be copied into any
# text editor and later submitted to the SIX CA for signing.
cat $PKCS_DIR/$FQDN.csr
Attach the .csr file to your request, or copy the complete output including the -----BEGIN CERTIFICATE REQUEST----- and -----END CERTIFICATE REQUEST----- lines.
Method 2: certreq.exe on Microsoft Windows Using a Configuration File
1. Provide the request.inf file on the instance
For the purpose of this manual, we assume the path %systemdrive%\temp\certdir\. Create the folder and save the content shown below as request.inf in it.
Show the content of request.inf
Copy the content below into a text editor such as notepad.exe and save it as request.inf. Adjust the values marked with a comment.
[Version]
Signature="$Windows NT$"

[NewRequest]
; Replace the values in Subject with your own data.
; CN: <appType>-<instituteIdentifier>[-<instanceId>], see the CSR requirements above
; OU: bLink - Test or bLink - Production
Subject = "CN=sp-IIDP01234, OU=bLink - Production, O=Donau Sandbank AG, C=CH"
KeySpec = 1
; KeyLength minimum is 3072
KeyLength = 3072
HashAlgorithm = sha256
Exportable = FALSE
MachineKeySet = TRUE
SMIME = False
PrivateKeyArchive = FALSE
UserProtected = FALSE
UseExistingKeySet = FALSE
SuppressDefaults = TRUE
ProviderName = "Microsoft RSA SChannel Cryptographic Provider"
ProviderType = 12
RequestType = PKCS10
KeyUsage = 0x80

[EnhancedKeyUsageExtension]
; Client Authentication
OID = 1.3.6.1.5.5.7.3.2

[Extensions]
2.5.29.17 = "{text}"
; DNS: the fully qualified domain name of the system that will use the certificate.
; Remove the example entry below and keep only your own.
_continue_ = "DNS=myserver.donau-sandbank.ch&"
; EMail: the mailbox that receives lifecycle notifications, for example expiry or
; revocation requests. Use a shared mailbox, never a personal address.
_continue_ = "EMail=cryptoservices@donau-sandbank.ch&"
2. Open the file in a text editor
Open %systemdrive%\temp\certdir\request.inf in a text editor such as notepad.exe.
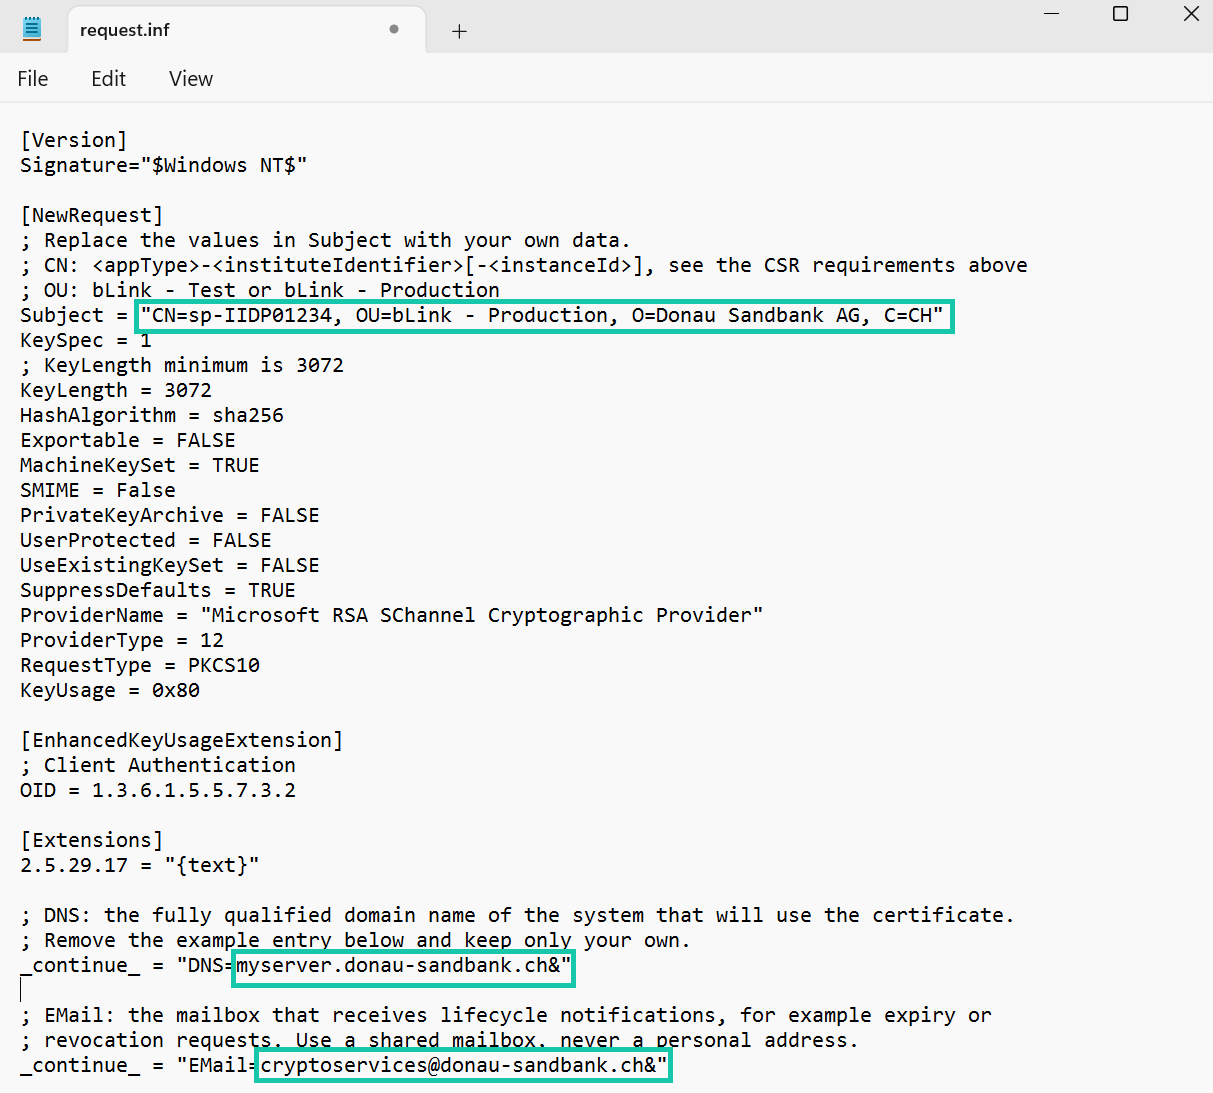
3. Edit the sections and parameters
The file is used to configure the Certificate Signing Request. Adjust the Subject line in the [NewRequest] section and the two _continue_ lines in the [Extensions] section. All other values can stay as they are.
4. Save the file in the correct encoding
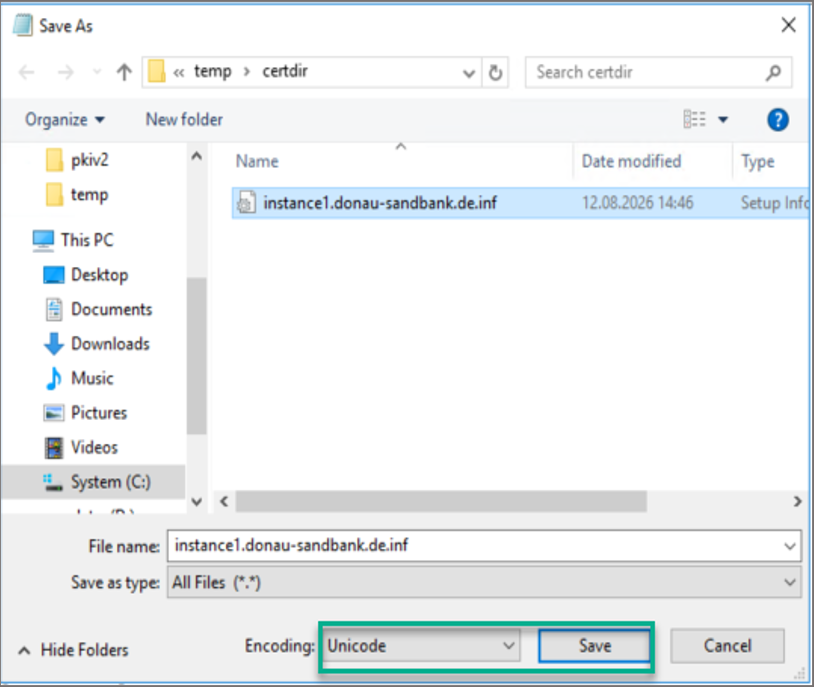
Save the file in Unicode encoding (UTF-16 LE). In notepad.exe, choose File > Save as, set Save as type to All Files so that no .txt extension is added, and select the encoding in the Encoding field. Depending on your Windows version, the entry is labelled either UTF-16 LE or Unicode.
5. Generate the CSR
Generate a PKCS#10 Certificate Signing Request based on the parameters defined in the request.inf file. The corresponding private key is created and stored in the Windows certificate store of the system where the command is executed.
Run the command in an elevated Command Prompt (Run as administrator). MachineKeySet = TRUE in the request.inf stores the private key in the machine key store, which requires administrative privileges.
REM This command generates a PKCS#10 message using the request.inf file as input
REM and generates the CSR as output to %systemdrive%\temp\certdir\myserver.donau-sandbank.ch.csr
certreq -new %systemdrive%\temp\certdir\request.inf %systemdrive%\temp\certdir\myserver.donau-sandbank.ch.csr

6. Display the CSR for later submission
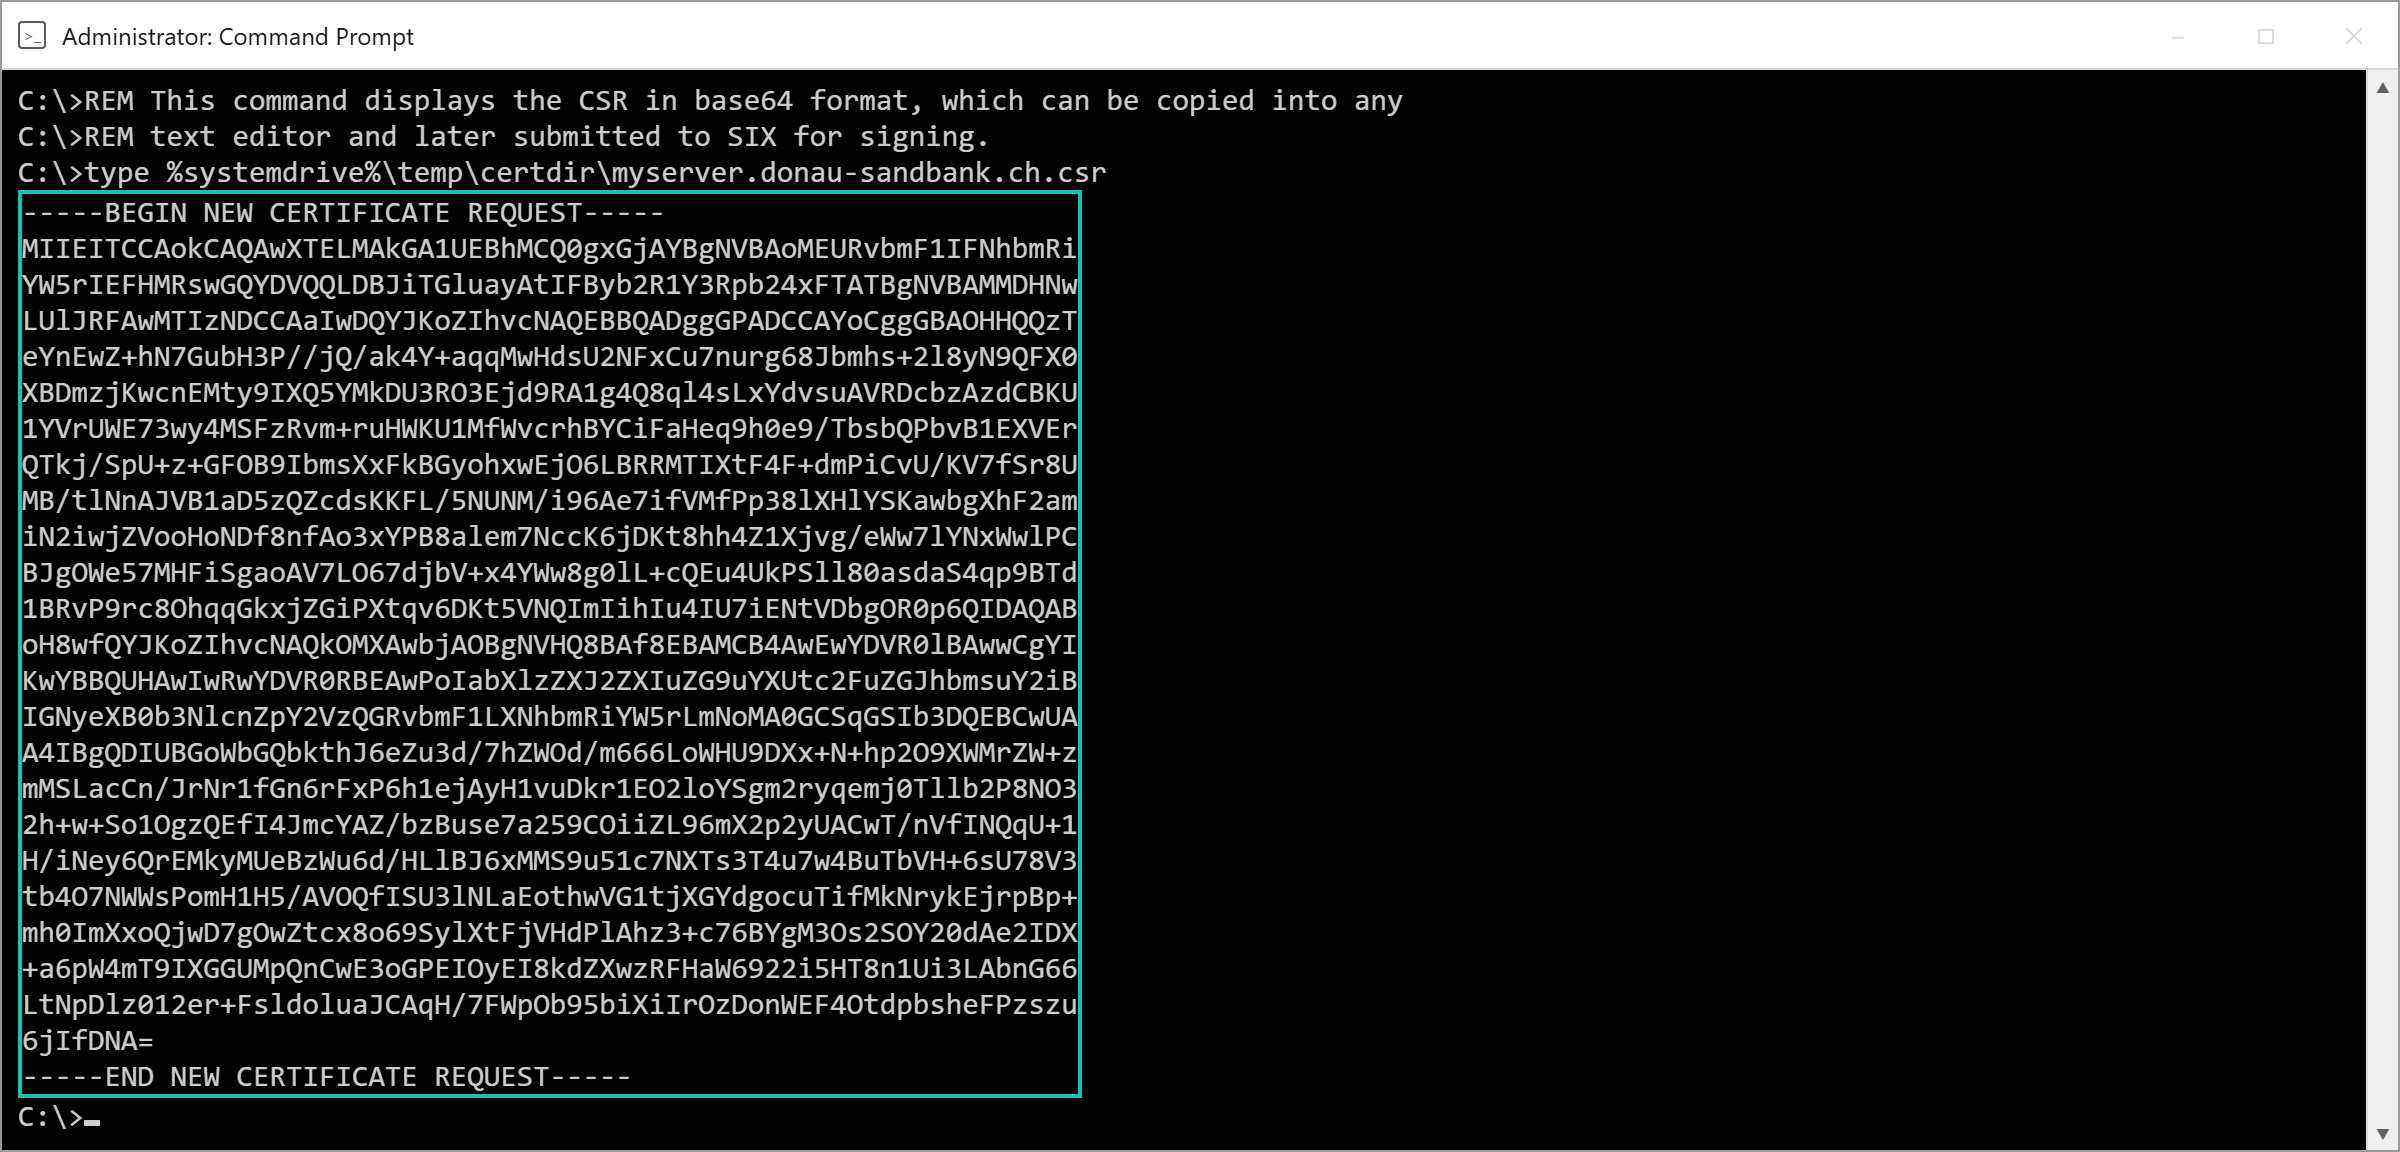
REM This command displays the CSR in base64 format, which can be copied into any
REM text editor and later submitted to SIX for signing.
type %systemdrive%\temp\certdir\myserver.donau-sandbank.ch.csr
Attach the .csr file to your request, or copy the complete output including the -----BEGIN NEW CERTIFICATE REQUEST----- and -----END NEW CERTIFICATE REQUEST----- lines.
Before you submit the request, you can verify the content of the CSR with certutil -dump %systemdrive%\temp\certdir\myserver.donau-sandbank.ch.csr and compare it against the CSR requirements above.
Method 3: Certificate Enrollment Wizard on Microsoft Windows (certlm.msc)
1. Open the certificate management console
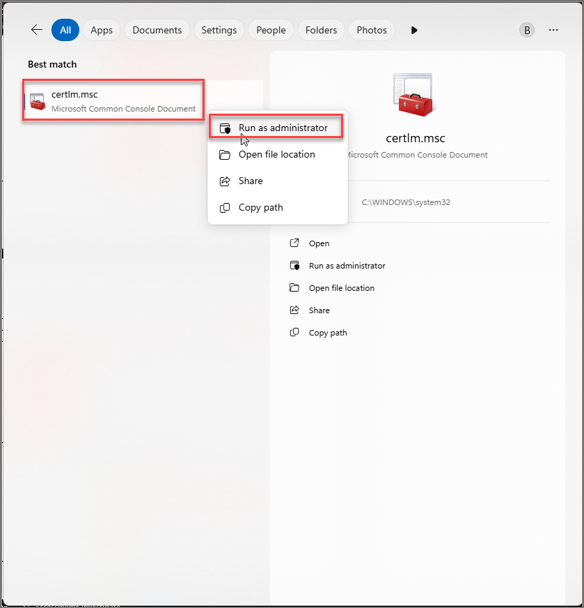
On the system for which the CSR shall be created, use certlm.msc and start it with administrative privileges.
2. Start the custom request wizard
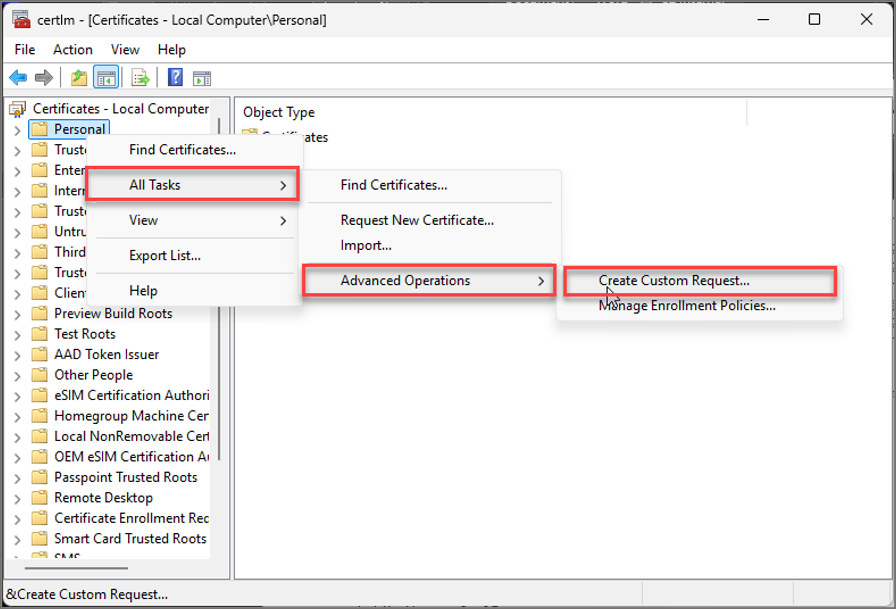
Navigate to Certificates - Local Computer > Personal > Certificates. Open the context menu and start the custom certificate request wizard by selecting All Tasks > Advanced Operations > Create Custom Request.
3. Select the enrollment policy
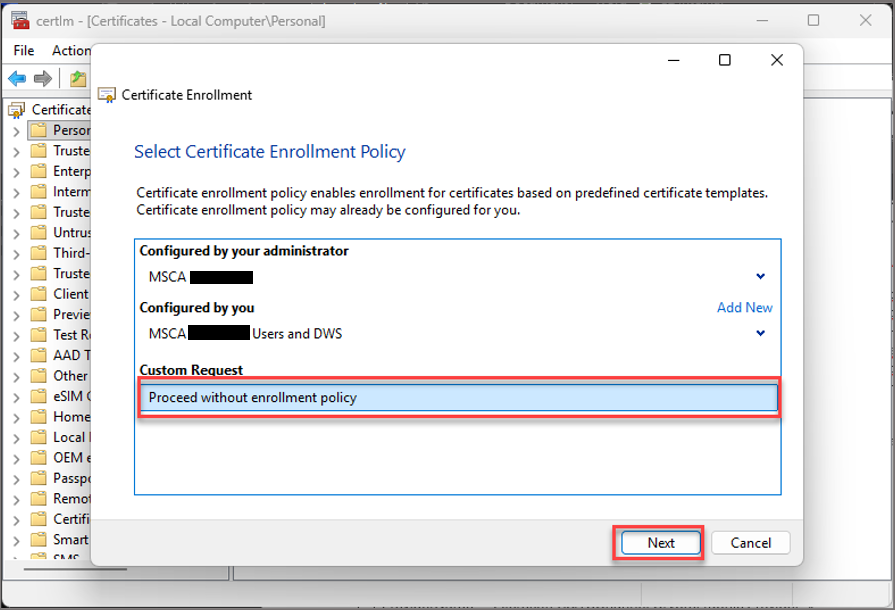
In the wizard, select Proceed without enrollment policy, then click Next.
4. Select template and request format
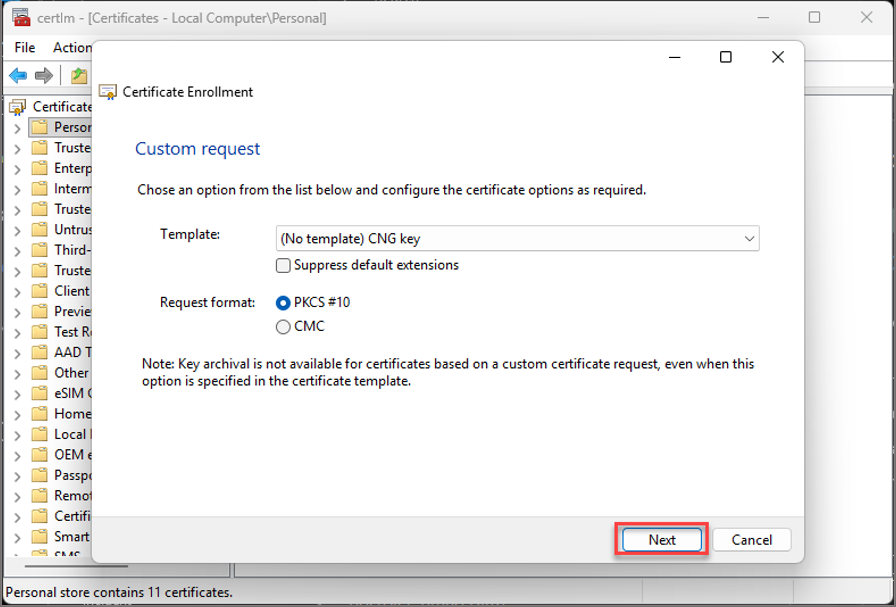
Select CNG Key in the template options and PKCS #10 as the request format, then continue with Next.
5. Open the request properties
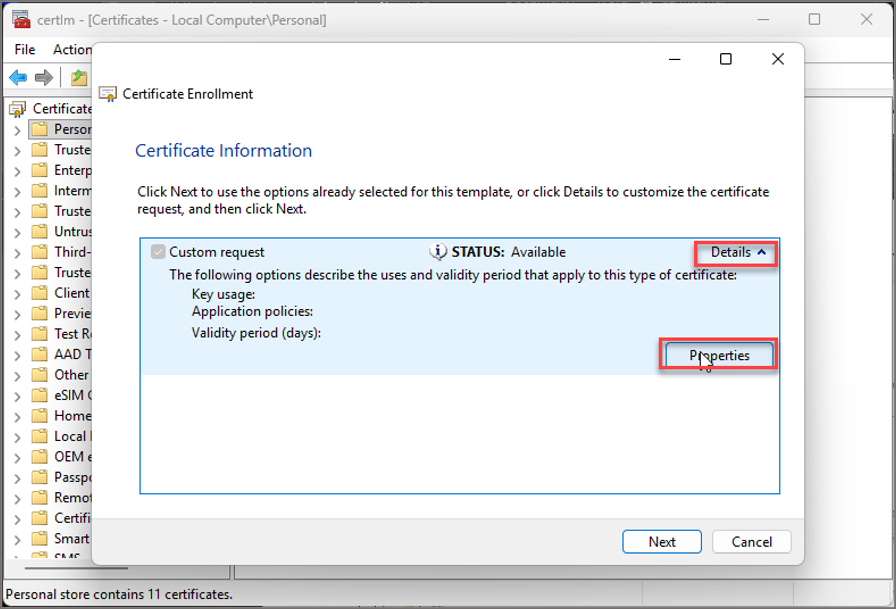
Expand Details and open Properties to define the certificate request attributes before creating the request file.
6. Enter a friendly name
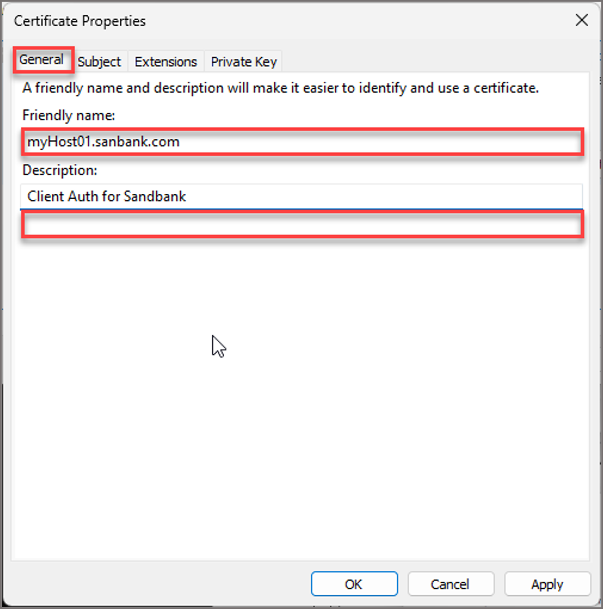
On the General tab, enter a meaningful friendly name and description. Use values that allow the certificate request to be clearly identified later.
7. Add the Common Name and the SAN DNS name
On the Subject tab, add the Common name (CN) according to the scheme described in the CSR requirements above, for example sp-IIDP01234. Do not use your company name here. Then add the Subject Alternative Name (SAN) DNS matching the FQDN of your instance.
8. Add the Organizational Unit and the SAN email address
Still on the Subject tab, add the Organizational Unit (OU), either bLink - Test or bLink - Production, depending on the environment the certificate is intended for. Then add the Subject Alternative Name (SAN) Email. The email address is used for lifecycle notification messages, only shared mailboxes are accepted.
9. Add the Organization
Still on the Subject tab, add the Organization (O) using your company's registered name.
10. Add the Country
Finally, on the Subject tab, add the Country (C). Country codes shall adhere to the ISO 3166 two letter code (alpha-2) standard, for example C=CH for Switzerland.
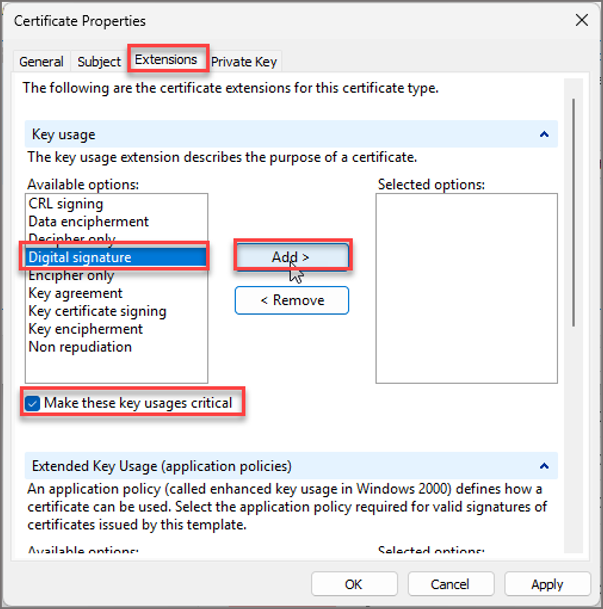
11. Configure the key usage
On the Extensions tab, configure the required key usage Digital signature and mark the extension critical.
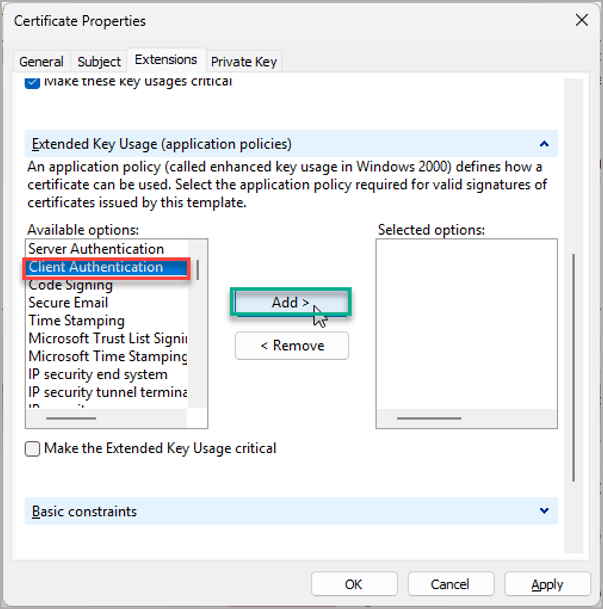
12. Configure the enhanced key usage
Still on the Extensions tab, scroll down and configure the Enhanced Key Usage Client Authentication.
13. Configure the private key
On the Private Key tab, configure the cryptographic provider, key length and export settings. Set Key size to 4096, 3072 is also accepted, and Hash Algorithm to sha256. Confirm the request information by pressing OK.
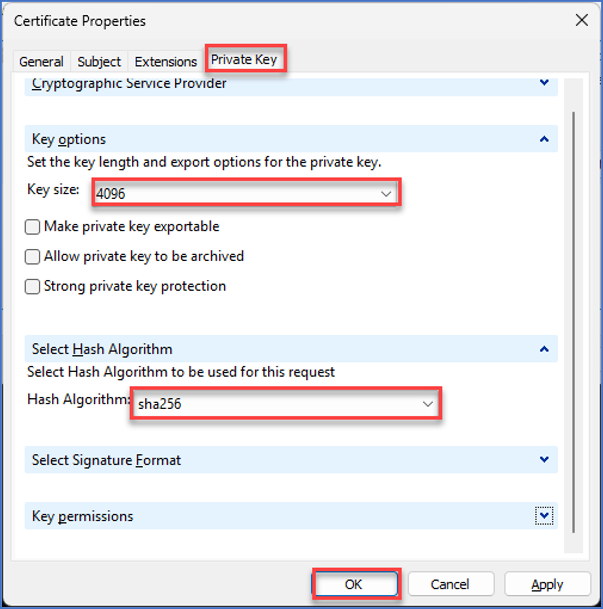
To adhere to key management best practices, it is recommended that the private key is NOT exportable. When this is the case, the CSR needs to be generated on the machine that is going to use the certificate.
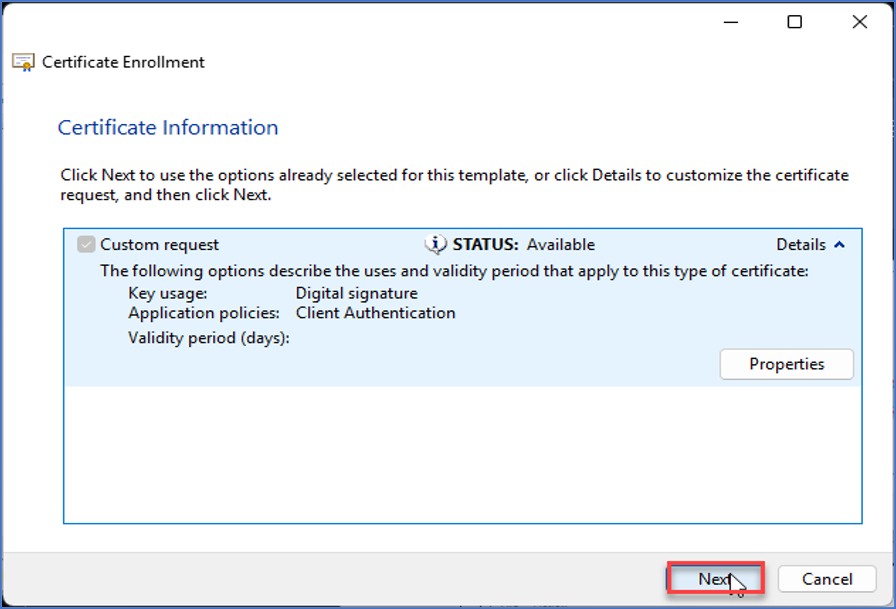
14. Confirm and save the request
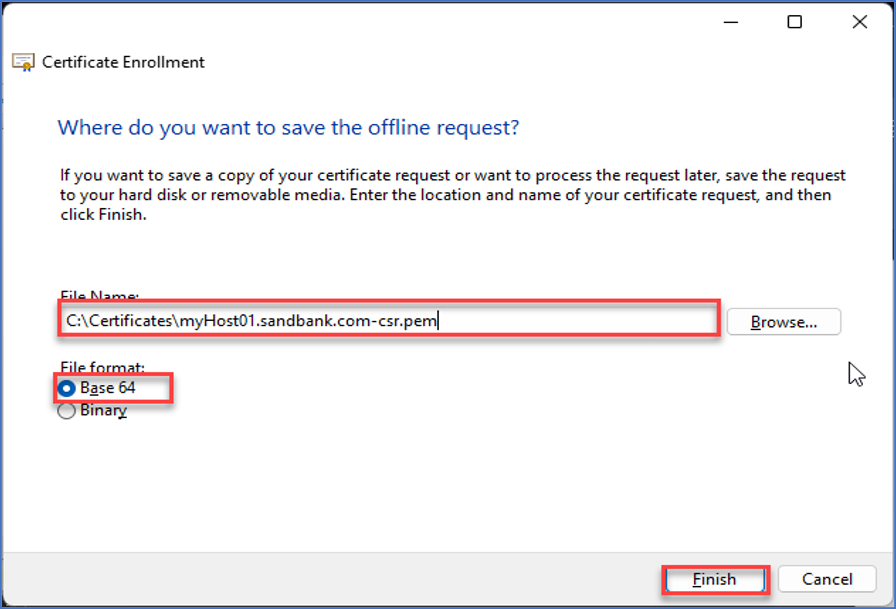
Confirm the configured request properties by pressing Next. Save the CSR file to a local directory selecting the File format: Base64 and conclude the Certificate Enrollment wizard by pressing Finish.
15. Obtain the CSR for later submission
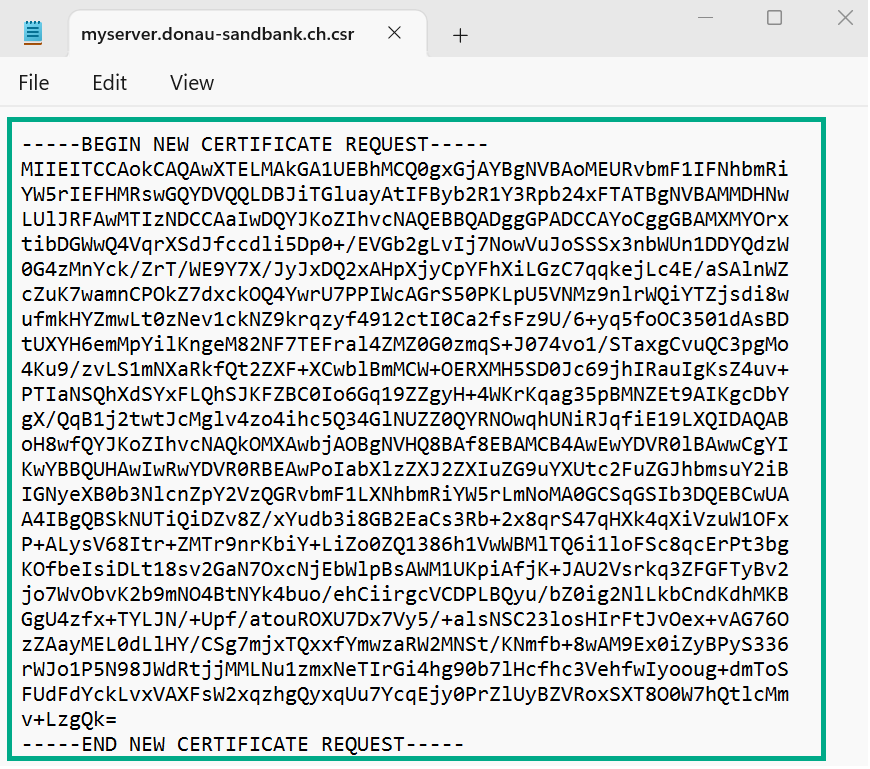
Attach the saved file to your request, or open it in a text editor such as notepad.exe and copy its Base64 encoded content including the BEGIN and END lines.
Step 2: Submit the Certificate Request
The CSR (PKCS#10, PEM) must be submitted to SIX through the bLink Support Portal. Please include the following information in your request:
- Target environment: Test system or Production
- Participant Role: Service User or Service Provider
The request must be submitted or confirmed by the Main Point of Contact. All information provided must be consistent and complete to avoid delays.
Step 3: Validation and Certificate Issuance by SIX
SIX performs a formal validation of the submitted request.
Validation criteria:
- The CSR content must match the submitted request data (CN, SAN, etc.)
- The contact and service information must correspond to the registered participant data
If inconsistencies are identified, a new CSR may be required. Upon successful validation, SIX issues the client authentication certificate and registers it internally for the relevant SIX systems.
Step 4: Certificate Delivery
The issued certificate is provided to the participant through the bLink Support Portal. The certificate in PEM (Linux and Windows) and DER encoded (Windows) is delivered together with the required certificate chain.
Step 5: Deployment and Usage
The participant installs the certificate, including the full trust chain, in their system landscape. If you used Method 2 or Method 3, import the certificate into the Windows certificate store of the same machine, so that it is linked to the existing private key.
For certificates created using Method 2 or Method 3, open an elevated Command Prompt and run:
certreq -accept -machine <your-certificate>.cer
This accepts the issued certificate and links it to the existing private key associated with the certificate request. The -machine option specifies the machine context for the certificate installation.
You can verify the installed certificate as follows:
openssl x509 -in <your-certificate>.pem -noout -subject -issuer -dates
The certificate can be used immediately after deployment. To confirm that the connection works, run the connectivity test described in the technical onboarding for your role.
Validity and Renewal
Participants are responsible for monitoring the validity of their certificates. Certificates remain valid until their defined expiry date. Participants are responsible for requesting a replacement certificate in due time before expiry, following the same process described on this page.
The CSR needs to be sent through the bLink Support Portal for configuration at least two weeks before the current certificate expires.
Whitelisted certificates are deactivated after three months without any operations, see TLS Certificates.
Key Compromise or Loss
If a private key associated with a certificate issued by SIX is lost, suspected to be compromised or otherwise exposed, participants must immediately inform SIX through the bLink Support Portal.
Upon notification, SIX takes the necessary steps to revoke and block the affected certificate to prevent unauthorised access. A new certificate must then be requested following the standard ordering process described on this page.
Participants are responsible for ensuring appropriate key protection measures on their side, including secure storage and access controls for private keys.
Price
Certificates issued through this process are free of charge until further notice.
Support and Contact
For questions regarding certificate requests, validation or deployment, contact SIX through the bLink Support Portal.